How I Learned Flask In 2 Days
October 2023
Github Resource here
Table of Contents
Intro
I had to make a web app for a complete architecture project. This include 2 mobile apps made with Kotlin, a fully-functional dynamic web app and an RDS DB instance. My team’s doing both mobile apps (Yea, I’m not an Android dev lmao), so I focused on making this website. I’ll say one of the members of my team helped me with the client-side code. (Yea, also the XMLHttpRequest(); stuff). I was focused more in the server-side code, since I have more experience with it.
I learnt Express.js, a backend framework to build minimal APIs for Node and JavaScript. I wasn’t comfortable with it a lot (and not because my professor wasn’t teach it well. In fact, he is one of the best programming teachers I’ve ever had) because JavaScript is not a language I really love. It’s good for basic stuff and for beginners but I’ma say I’d rather use Python or Rust (soooooon). Also, I find the fact that I cannot learn so quite a bit at the time I’m surrounded with my fellow extroverts haha. I need some space to learn, to capture more knowledge to my fully-prepared brain. I discarted Express.js for this project for time reasons but also I needed to build something with passion and discipline.
My professor suggested me Flask as a good option framework with Python. I didn’t know how th I’d implement Flask in the whole app. I started resourcing by myself in a week we call “Semana Tec”, which is like an week-off once we finish a period (A semester has 3 periods).
Before starting this journey, I’ll say that previously I had some knowledge about HTTP methods, status codes and basic APIs development since my experience with Express.js. But, as I said before, I didn’t learne quite a bit so I checked it again by my own before starting out.
Yea, that’s when I proposed myself I can learn a whole framework within 2 days. For that, I needed to find a good idea for a project that may allow me to learn Flask. Then, I decided to make F-test.
F-test
Originally, F-test was a BMI calculator. A basic web app and super boring lmao. I improved it by setting up a new goal: A single app that sends, edits and deletes data from a single HTTP layout. Where is this data stored? Yea, good question. Remember I said something about an RDS DB instance? Yea, well… I used MariaDB as the DBMS since I had experience with MySQL back in the day. Also. I used SQL Server someday but I didn’t like it at all lol.
Anyways, for this project, I needed to make the design, the requirements .txt, etc. I realized that also I needed some dependencies.
$ pip install flask werkzeug python-dotenv tenacity mariadb
I did all stuff a software developer would do (I’m not referring to drink 8 cups of coffee). I set up my environment, my project distribution by folders, etc. I created my .env and .gitignore for my environment variables in Python.
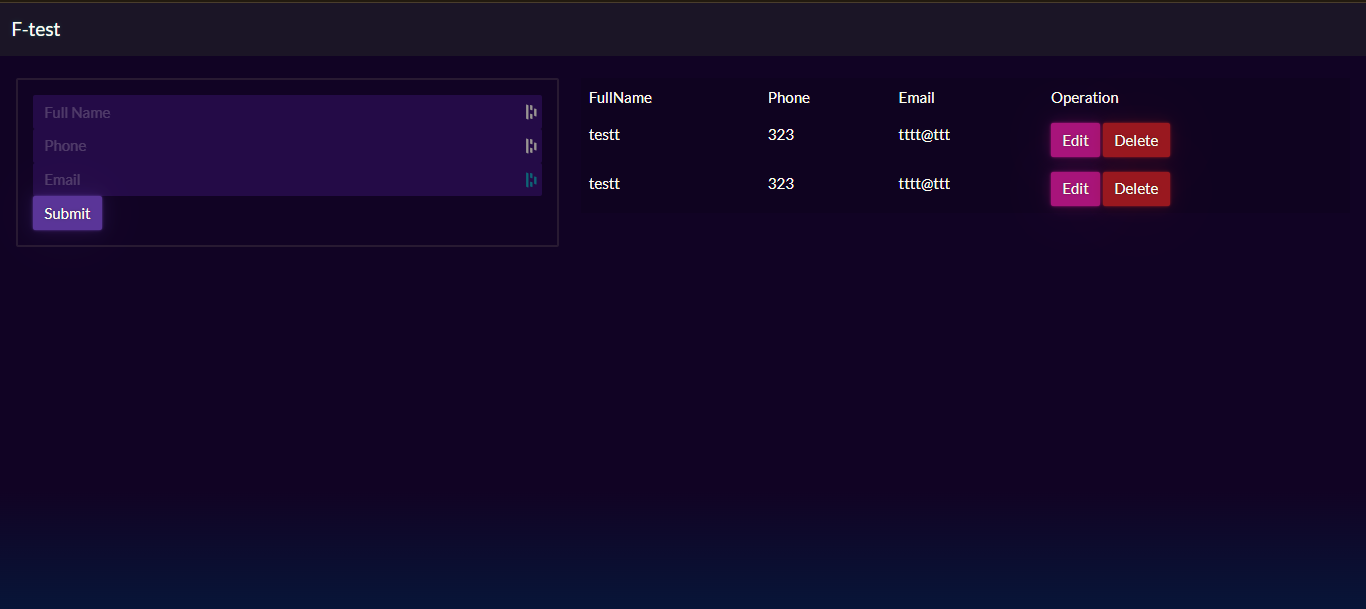
And I moved on. I needed to make the app functional first rather than deploying it useless but with a good look. I created a simple HTML format and I started to make tests.
I have 3 labels: Name, Phone and Email (Yea, what you can expect from a basic register format), but the intersting thing is here: You also can access, edit and delete those labels in the app, not in the proper DB. Also you can add data!
In the Frontend section I’ll explain how I did it, but first I needed to build the APIs
APIs
Flask is a modern backend framework to build minimal and scalable applications. If you are interested in more about this framework, you can click here.
The whole app makes 5 apps: Deploy the layout.html file, show the data, adds data, deletes data and edits that data. For this stuff, I already know that at least, I’ll need 4 APIs. But I guess, I’m not done.
Somehow I need to figure out how to send data into a DB (In this case, a MariaDB server cuz I like MariaDB lmao). I remember I learnt how to create and manage stored procedures. These are like a simple .sql code block that may allow us to insert, get, delete or show any data. What I wanted to do is all of that inside the view. Flask will allow me to create queries and stuff.
Before showing any code, I’ma say that F-test uses its HTML format to call the endpoints, then to be shown in the view. It’s like the MVC model. Now, how I call an endpoint from the HTML using Flask? Welllllll, there’s something called Jinja2. To summarize it, Jinja2 is a template engine for Python that supports unicode characters. Also, Flask is compatible with Jinja2. So yea, I use it.
I said before I needed to show some data in the page retrieved from the DB. Mhm, alright.
SELECT * FROM contacts
Easy peasy. Just I need to figure out how I will show this. Alright. But, waittttt, I need to create the Flask project with the dependencies I installed before!
#!/usr/bin/python3
from flask import Flask
import os


app = Flask(__name__)
app.secret_key = os.getenv('DB_SECRET_KEY')
Easy peasy again. Now I can show the data? No, wait. I need the DB connection.
#!/usr/bin/python3

from dotenv import load_dotenv
import mariadb
import os
import sys

load_dotenv()


def connection() -> mariadb.Connection:
    config = {
        'host': os.getenv('DB_HOST'),
        'port': int(os.getenv('DB_PORT')),
        'user': os.getenv('DB_USERNAME'),
        'password': os.getenv('DB_PASSWORD'),
        'database': os.getenv('DB_NAME')
    }

    try:
        conn = mariadb.connect(**config)
        print("Connected")  # Debug Message
        return conn
    except mariadb.Error as e:
        print(f"Error Connecting: {e}")
        sys.exit(1)
Alrighty then. Now may I? Sure, let’s do it.
#!/usr/bin/python3

@app.route("/")
def root() -> str:
    conn = connection()
    cur = conn.cursor()
    cur.execute("SELECT * FROM contacts")
    data = cur.fetchall()

    return render_template('index.html', contacts=data)
As u noticed before, I’m using decorators to stablish the endpoint route and the HTTP method. In this case, it’s GET but it’s not necessary to type it in the root endpoint. (The root endpoint in this case will be the first layout HTML that’ll be shown the first time I deploy a page (locally or remotely)).
Note that also I’m using enviroment variables for the connection requirements, as well as the secret key (without it, the page raises an exception lmao).
But here’s the major question: How I call this endpoint with HTML to be shown then into the page? Mm alright.
<div class="col-md-7">
        <table class="table table-bordered table-borderless table-active bg-white table-responsive-sm">
            <thead>
                <tr>
                    <td>FullName</td>
                    <td>Phone</td>
                    <td>Email</td>
                    <td>Operation</td>
                </tr>
            </thead>
            <tbody>
            {% for contact in contacts %}
                <tr>
                    <td>{{ contact.1}}</td>
                    <td>{{ contact.2}}</td>
                    <td>{{ contact.3}}</td>
                    <td>
                        <a href='/edit_contact/{{ contact.0 }}' class="btn btn-secondary">Edit</a>
                        <a href='/delete_contact/{{ contact.0 }}' class="btn btn-danger">Delete</a>
                    </td>
                </tr>
            {% endfor %}
            </tbody>
        </table>
    </div>
The main objective of this article is not about frontend and HTML. I’m not a frontend dev (I mean, I know some HTML stuff about divs and formats) but honestly, I had a little help with this. It’s quite easy to learn!
With jinja2, I’m using divs to make a table where I will allocate the data. Inside the table, I need a loop to iterate every contact just to be shown like {{ contact.1 }} . The last HTML cell, notice I’m already referencing 2 endpoints with a parameter (as well as a button class).
Inside the UI, I need to store, edit and delete data. I’ll not do that by queries using phpmyadmin dude, the client is not going to be happy with that lmao. Anyways, I need the endpoints to make all these stuff (“/all_contact”, “/edit_contact/
#!/usr/bin/python3

@app.route("/add_contact", methods=['GET', 'POST'])
def add_user():
    if request.method == 'POST':
        fullname = request.form['fullname']
        phone = request.form['phone']
        email = request.form['email']

        try:
            conn = connection()
            cur = conn.cursor()
            cur.callproc('insertContact', (fullname, phone, email))
            conn.commit()
            flash("User Added Successfully")

            return redirect(url_for('main.root'))
        except mariadb.Error as e:
            print(f"Error executing SQL: {e}")
            return "Error"
        finally:
            if conn:
                conn.close()
What th did I just code? Lemme explain it. I’m using the GET method to retrieve the contacts from the DB, but why I’m executing the try statement only if the POST method is true? Well, since we are sending data into the DB. (Yea, adding contacts means I’ll store it once I deploy it in the page). I’m making a connection with the function I did before. With that connection, I’m making a cursor which will allow me to execute queries, stored procedures, etc. In this case, I wanna insert contacts into the DB, with an stored procedure with 3 args to avoid SQL Injections. Once I call the procedure, I commited it (exexute it), then to redirect to the main layout HTML frame. If the procedure cannot be executed, the function raises an exception.
If you know some python, you can notice that in the end I’m using a finally statement. This code block will be executed independently of the exception raised before (if it was raised obviously). This means this code will be run anyway. IN this case, I’m using it to close the DB’s connection.
Now that u know I did this, we can code the rest of the APIs. I need to delete and edit data inside the layout HTML page too! Well, remember this?
<a href='/edit_contact/{{ contact.0 }}' class="btn btn-secondary">Edit</a>
<a href='/delete_contact/{{ contact.0 }}' class="btn btn-danger">Delete</a>
Well, let’s start with delete. For instance, there’s an HTTP method called DELETE. However, I don’t specifically to detail the DELETE method with Flask, the framework is doing that for you. But this doesn’t mean you don’t need to put it in the code if you are using another framework/language. For example, ExpressJS with JavaScript or sometimes Ruby on Rails with Ruby uses this typo to execute the method (unless you wanna get an 405 error lmao). If you wanna modify the code and try it by yourself, go ahead.
#!/usr/bin/python3

@app.route("/delete_contact/<string:id>")
def delete_contact(id: int) -> Response:
    conn = connection()
    cur = conn.cursor()
    cur.execute('DELETE FROM contacts WHERE idcontact = {0}'.format(id))
    conn.commit()
    flash("User Removed Successfully")

    return redirect(url_for('main.root'))
In this case, I’m not using an stored procedure since it’s a simple SQL query to delete data. However, you can modify it by implementing an stored procedure. (Remember, I’m using MariaDB).
Now, what about editing data? Well, that’s curious because I firstly need to retrieve this data from the HTML format then to be edited. Well, for this, I need another endpoint to retrieve this data. Wait, did I just retrieved it twice? (One for the root endpoint, another one for editing it). Yea, because what I wanna to is to redirect to an another HTML format where I can edit it. If I implement the same ìndex.html` format, I need to remove the table to then, insert a new format to edit the data. Totally unacceptable.
<!-- edit.html -->

<div class="col-md-5 offset-md-4">
    <div class="card card-body">
        <form action="/update_contact/{{ contact.0 }}" method="post">
            <div class="form-group">
                <input type="text" name="fullname" placeholder="Full Name" value="{{ contact.1 }}">
            </div>

            <div class="form-group">
                <input type="text" name="phone" placeholder="Phone" value="{{ contact.2 }}">
            </div>

            <div class="form-group">
                <input type="text" name="email" placeholder="Email" value="{{ contact.3 }}">
            </div>

            <div class="form-group">
                <button type="submit" class="btn btn-primary btn-success btn-block">Submit</button>
            </div>
        </form>
    </div>
</div>
First, I need to retrieve the data as I said before.
#!/usr/bin/python3

@app.route("/edit_contact/<string:id>", methods=['GET'])
def get_contact(id: int) -> str:
    conn = connection()
    cur = conn.cursor()
    cur.execute('SELECT * FROM contacts WHERE idcontact = %d', (id,))
    data = cur.fetchall()
    print(data[0])  # Debug Message

    return render_template('edit.html', contact=data[0])
Now that I have this, I can edit it. (Note, the previous function returns the template and the contact I’ll edit.)
#!/usr/bin/python3

@app.route("/update_contact/<string:id>", methods=['POST'])
def update_contact(id: int) -> Response | str:
    if request.method == 'POST':
        try:
            conn = connection()
            cur = conn.cursor()
            cur.callproc('updateContact', (id, request.form['fullname'], request.form['phone'], request.form['email']))
            conn.commit()
            flash("User Updated Successfully")

            return redirect(url_for('main.root'))
        except mariadb.Error as e:
            print(f"Error executing SQL: {e}")
            return "Error"
        finally:
            if conn:
                conn.close()
Now that I’m done, let’s deploy the page to see if it works. (Note, while I was developing F-test, I didn’t really use Postman to check if the APIs were working properly since it’s a really small project. Remember, I had no idea about Flask until now :) ).
#!/usr/bin/python3

from app import app
import sys

if __name__ == '__main__':
    app.run(debug=True)
    sys.exit(0)
Now’s done! This will deploy a local server running on port 5000 by default. However, you can specify it with the port="" arg. Note that once you finish running, you must press ctrl+c to kill the process (or you just can do the following if u didn’t kill the process accidently, only applies for Linux):
FIrst, check the process’ PID (that’s a number, like 960 or 1738)
$ sudo netstat -anp | more
Next, kill it
$ sudo kill -9 <PID>
It’s very important to me to keep ports non-listenable for hackers in case they use nmap to exploit ‘em lmao
Conclusion
Do u like it? I used Bootstrap and Bootswatch for the colors and designs. I’m not quite good with CSS but I tried my best.
I really did this project to challenge myself if I was capable to learn a new framework for me in less than one week. Of course, this was because I had to build another backend app for my college project which was way bigger than F-test. I think I accomplished it.
And I forgot to say, my uni didn’t give me any lessons about Flask (except for HTTP methods and stuff), I had to learn it by my own. That was quite good :), it remembered me some times I challenged myself with algebra equations with time on hand back in high school. Awesome.
Hope you learn something new!. If you have some doubts or toubles, don’t forget to mail me.
Happy coding :)